Presenting metadata
We built a simple UI, but it’s already showing games for the user to pick and launch. Let’s make it more complete by showing information about the game, such as title, description, and rating, when the user picks them.
Creating metadata viewer
Let’s create a new scene, called metadata_viewer.tscn. Make it inherit from User Interface (aka Control); this node will be added to the main theme, so there’s no need to handle layout in this scenario.

Similarly to what we did for system views, let’s add a ScrollContainer to add scroll bars if the content doesn’t fit on screen. Add a ScrollContainer, and set it’s layout to Full Rect.

We will have multiple objects inside this container, so add a VBoxContainer to order them vertically. Set it to Expand as well.

Now we start building the UI for showing all the information we want. RetroHubGameData has plenty of variables available, and because building an UI for all of them is time-consuming, we will just focus on a few of them: name, description, release date and rating.
Creating a name field
Let’s start by building a base structure for showing the name. We can then duplicate if for the other fields and change each structure a bit for speeding up this process.
Create a HBoxContainer, and inside it create two labels: Label (you can leave the default name) and Name (it’s this one we will change in code).

The Label will just describe the name of this field, so set it’s content to Name: (add a space at the end so the text next to it isn’t “glued” to the left).

The Name label will be left empty, as it will be set in code. However we need to change some settings. Set Autowrap to Word to prevent very long lines of text making this label huge. To ensure it also gets all horizontal space available, set the horizontal size flag to Expand as well.

Now would be a good idea to test this before moving on. It’s going to take a bit of work to connect this scene to the theme in the end, so we’ll cheat for now by generating a random game data in here, and using it instead.
Create the script at the root MetadataViewer object, which will be called metadata_viewer.gd. We add the nodes we’re interested in editing, and change them when game data arrives:
extends Control

# Nodes to edit
@onready var name_label := $ScrollContainer/VBoxContainer/HBoxContainer/Name

# Game data to display
var game_data : RetroHubGameData:
        set(value):
                game_data = value

                # Edit our nodes as soon as data is received
                name_label.text = game_data.name

func _ready():
        # Debug: Generate a random game data for now.
        # System data is used internally, so in this case it's alright to set to null
        var random_data = RetroHub.gen_random_game(null)
        game_data = random_data
You should now run this scene instead of the whole project. Check that there is a name present when you run it.

Showing the remaining content
Our name object works perfectly! Let’s go ahead and create the remaining fields: description, release date and rating.
Duplicate the HBoxContainer 3 times, so you get 4 nodes in the end. Go to each Label and change the name accordingly, and rename Name to each field name.

Now let’s go through each field which needs some tweaking.
Description
Descriptions are very likely to contain a lot of text. We can increase it’s vertical size a bit to reflect that. Set the minimum vertical size to 150 pixels.

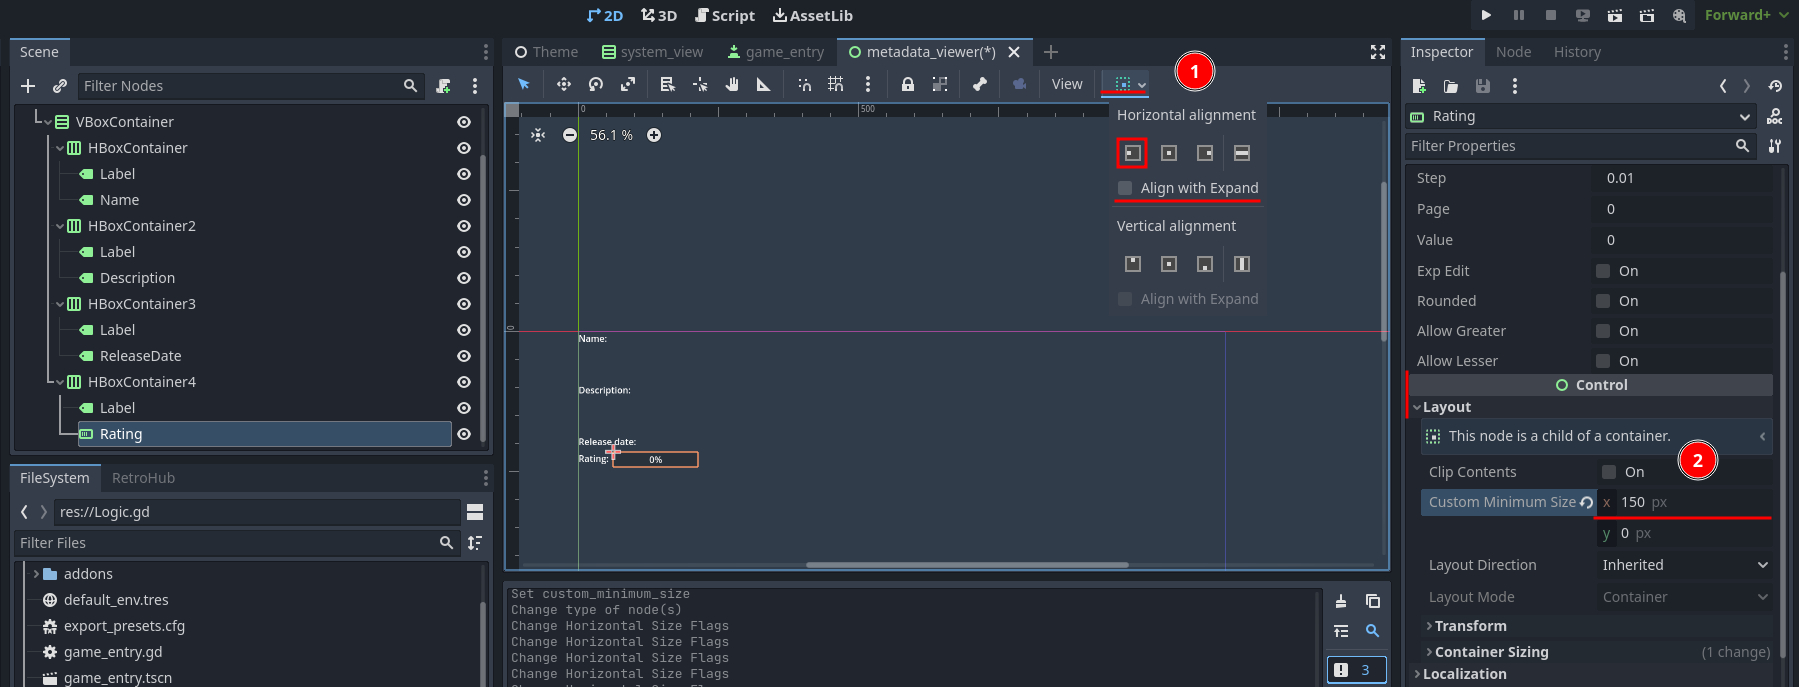
Rating
Rating will be a value between 0 and 1. So it makes more sense to show this information differently. Change the Rating node type to be a ProgressBar instead. Because it has the size flag set to expand, it occupies the full width, which is unnecessary and looks bad. Reset it’s size flags to Shrink Begin and set a minimum horizontal size of 150 pixels.
Now, we can add the new nodes to our metadata_viewer.gd script to show all the information:
extends Control

# Nodes to edit
@onready var name_label := $ScrollContainer/VBoxContainer/HBoxContainer/Name
@onready var description_label := $ScrollContainer/VBoxContainer/HBoxContainer2/Description
@onready var release_date_label := $ScrollContainer/VBoxContainer/HBoxContainer3/ReleaseDate
@onready var rating_progress_bar := $ScrollContainer/VBoxContainer/HBoxContainer4/Rating

# Game data to display
var game_data : RetroHubGameData:
        set(value):
                game_data = value

                # Edit our nodes as soon as data is received
                name_label.text = game_data.name
                description_label.text = game_data.description
                release_date_label.text = RegionUtils.localize_date(game_data.release_date)
                rating_progress_bar.value = game_data.rating * 100

func _ready():
        # Debug: Generate a random game data for now.
        # System data is used internally, so in this case it's alright to set to null
        var random_data = RetroHub.gen_random_game(null)
        game_data = random_data
Note
The release date text is in ISO8601 format (e.g. 20190514T145802). To properly display this information, we used methods from RegionUtils. You should rely on this in your theme to take into account the user’s region and always format it properly.
Run the scene and you’ll see all the new information displaying properly. Try resizing the window and check that the content resizes properly.

Connecting everything up
Now that we can successfully show game metadata, we need to add it to our main scene, and give it data to show. This last step will be a bit tricky, because the objects with all the game data are our game entries. They can’t access the metadata viewer directly, so we’ll have to change some things in the code to support this.
Firstly, let’s add it to our main scene, which is the easy part. Open the main Theme.tscn, and instance our metadata_viewer.tscn scene through Instance Child Scene.

Move and resize the object so it only occupies the right portion of the screen, being careful not to overlap with the system view.

Now it’s time to connect this in code to receive metadata to show. Recall that SystemView instances GameEntry children, and each entry is assigned it’s own game data. Each button has a pressed signal whenever it’s pressed, which we need to use anyways. One solution is to use this signal to transport each button’s game data (in Godot, you can bind extra variables to signals). Edit system_view.gd:
...
func _on_game_received(game_data: RetroHubGameData):
        if game_data.system == system_data:
                var game_entry = preload("res://game_entry.tscn").instantiate()
                game_entry.game_data = game_data
                game_entry_container.add_child(game_entry)
                game_entry.pressed.connect(_on_game_entry_pressed.bind(game_data))


func _on_game_entry_pressed(game_data: RetroHubGameData):
        # TODO
        pass
We now have a way to check when a button is pressed, and know what game data it has. However, we still can’t access the MetadataViewer object from the SystemView code, so let’s propagate this signal further. Create a new game_selected signal, and emit it when any game entry button is pressed:
extends VBoxContainer

signal game_selected(game_data: RetroHubGameData)

@onready var system_name_label := $SystemName
@onready var game_entry_container := $GameEntryContainer

...

func _on_game_entry_pressed(game_data: RetroHubGameData):
        game_selected.emit(game_data)
Alright, that takes care of the problem! SystemView now has a signal which will be triggered whenever an entry is pressed, and it exposes that entry’s game data. We can now connect to this signal from our root Theme scene, although we need to do it in code as we’re creating SystemView instances in runtime. Edit Logic.gd:
...
func _on_system_received(data: RetroHubSystemData):
        var system_view = preload("res://system_view.tscn").instantiate()
        system_view.system_data = data
        system_view.game_selected.connect(_on_game_selected)
        system_view_container.add_child(system_view)

## Called when a game entry is selected by the user
func _on_game_selected(game_data: RetroHubGameData):
        pass
All that’s left now is get a reference to the MetadataViewer child, and then pass the game data onto it:
extends Node

@onready var no_games_label := $NoGames
@onready var system_view_container := $ScrollContainer/SystemViewContainer
@onready var metadata_viewer := $MetadataViewer

# _ready function, called everytime the theme is loaded, and only once
func _ready():
        # App related signals
        RetroHub.app_initializing.connect(_on_app_initializing)
        ...

...

## Called when a game entry is selected by the user
func _on_game_selected(game_data: RetroHubGameData):
        metadata_viewer.game_data = game_data
And it’s done! Run the project now, and click on the game entries. The metadata will change accordingly to show that entry’s information!

Note
Don’t forget to remove the _ready function from metadata_viewer.gd which generated random games for testing!
Launching games
Now that we can properly display game information, we’re ready to let RetroHub know the user has selected a given game, and wants to launch it.
Generally, you should allow users to select a game before launching it, which allows them to edit it’s metadata or scrape information from the main app.
We already have a system in place to know which game entry was selected, so we’ll use it to signal RetroHub. Edit Logic.gd:
...
## Called when a game entry is selected by the user
func _on_game_selected(game_data: RetroHubGameData):
        metadata_viewer.game_data = game_data
        RetroHub.set_curr_game_data(game_data)
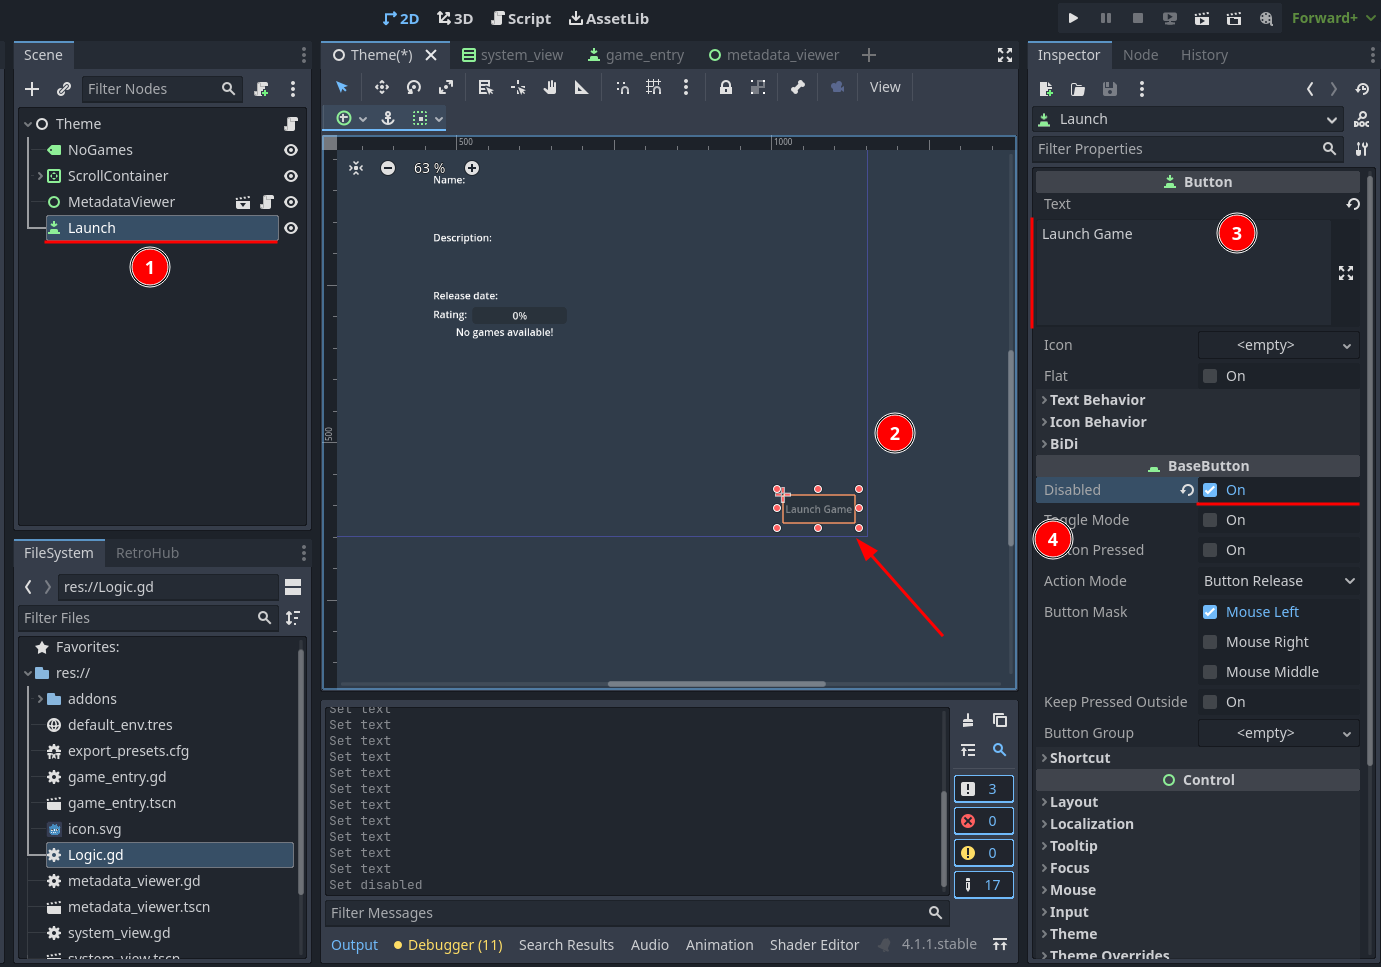
Now, we need to launch the game. If we used the current game entry buttons to do that though, the user would never have the chance of viewing the game information before launching it. So, let’s create a new Button just for that.
Move it to the right-bottom corner and give it an appropriate label, such as “Launch Game”. We need to have it be disabled by default: when the app launches, no game data is selected, so if the button was active, the user could try to launch a null game data, which would cause problems.
Time to code it’s behavior. Let’s start by re-enabling it when a game entry is selected, on Logic.gd:
extends Node

@onready var no_games_label := $NoGames
@onready var system_view_container := $ScrollContainer/SystemViewContainer
@onready var metadata_viewer := $MetadataViewer
@onready var launch_button := $Launch

...

## Called when a game entry is selected by the user
func _on_game_selected(game_data: RetroHubGameData):
        metadata_viewer.game_data = game_data
        RetroHub.set_curr_game_data(game_data)
        launch_button.disabled = false
Since this button is part to the scene, we can connect to the pressed signal from the editor. Ensure it will add the method to the root Theme node (thus, on Logic.gd).

Now it’s just a matter of asking RetroHub to launch the currently selected game data:
## Called when the launch button is pressed
func _on_launch_pressed():
        RetroHub.launch_game()
You can run the project now, and try launching a game. You’ll see that no game will actually launch (this is random data anyways; sorry, I know you wanted to find out what “Roads and Spaceflight” was about), but if you look at the console output, you’ll see messages indicating that a game is launched. This means everything is working; if this theme was running under RetroHub right now, it would launch the game!
Before exporting our theme to the final app, however, let’s spice things up with some game media in the next section.